


Basic Sanding
These dolls are 3D printed directly into resin, so it has some flaws. Here in this collage you can see some cases. Basically, you'll get those weirds waves marked in the resin, and also the places where the holders (or whatever are called) stood. You will need to sand everything out. Here are some examples of the unfinished details:

However, you have to be careful. I attempted to "shallow" one of those protrusions using a cutter, and the entire thing went off, leaving a hole in the doll's hip joint. It wasn't much of a problem since it is hidden in the joint, but in any case, worth mentioning. You can see it here in this photo:

What I did was basically wet a very thin sand, and use that. It took a considerable amount of time, but cleaning the doll every now and then on clean water was the best. After it was done, I used the regular cleaning sponge to get rid of everything. I must point that it isn't perfect. I could've done a far better job, but I was lacking patience and time. Also, I do want to point out, lighter colours are easier to work with, and you won't have to struggle as much as I did.
Stringing
In a short sentence, one hell of a mess. Let's look at all the parts that you need, in the below image (note, that I put the tights backwards in this photo, so please be reminded of it).

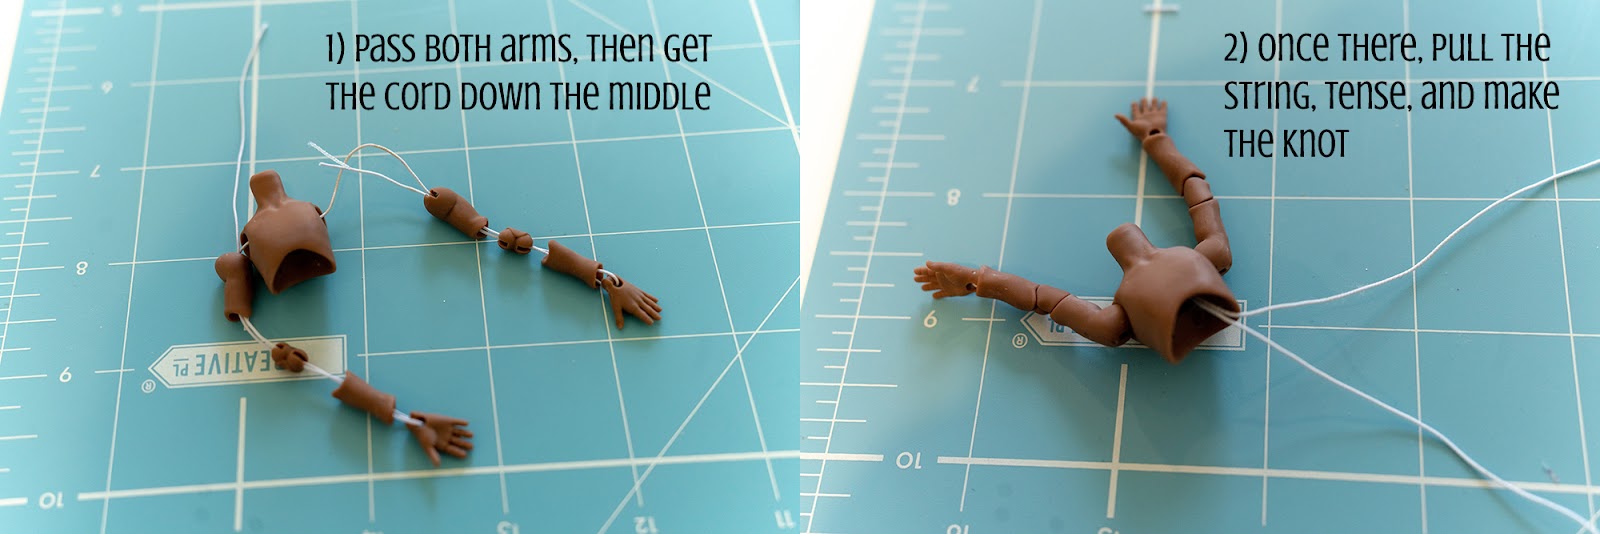
A hugely negative point of these dolls is that you don't use S hooks. Why is this important? If you have S-hooks, you can make the loop on the string, pass it, hold it with something, plug the hook and add the hands/feets. By not having an S-hook, you have to basically pass it untied and then struggle to tense the dang donl while holding it, and also while keeping inordinate tension on it. In other words, it isn't easy and in some parts, it feels like a 2-people job.
So, for the arms you have to take the entire string, pass from the chest to arm, elbow, forearm, loop in the wrist, then come back through forearm, elbow, armpit and pass a loose strand to the chest. Repeat in the other arm, then struggle to tense and knot. Do notice that the doll's arms are so minute the cord is barely 1mm thick. It's so thin it doesn't feel as it has tension, but it has enough for the doll itsel.
For the legs, you have a huge mess. You have to loop from the head-back, down the torso, the hips, then through one leg (tight, peanut, calf, foot, and up) and pass that bit of the loose string through the head. You use the remaining one for the other leg, and have to struggle to keep the doll open between torso/hips joint, while pulling the string to tense it and make a knot that will provide tension. I honestly needed help and ended up with several cuts on my fingers. The doll is about 12cm tall, it is a mess.
Painting
There is not much to say, but you should use the same paintings and elements you use for regular resin. This is resin after all, but 3D printed. Glueing the magnets was a mess. I don't have a silicon gun anymore, and the regular silicon-based glue does nothing and the magnets keep popping off. But that's my lack of proper glue, nothing related to the doll.

Ad after all, here you have a closeup of Sandy. I still need to get some lashes and add decorations to her horns.

I hope this was helpful, and fingers-crossed I can finish her soon!


Congrats on Sandy - haha, nomen est omen ;)
ReplyDeleteThank you so much!! :D
DeleteCongrats on Sandy and a great tutorial on assembling her. And I agree with you on the S-hooks.
ReplyDeleteThank you so much!! Yes, the S-hooks (or the lack of it) are very complicated. Especially because even replacing her hands is an unreasonable challenge D:
Delete